使用的Linux(Ubuntu 16.04)系统,运用了Hadoop3.1.3环境、Spark2.4.0大数据分析引擎、Python3.8编程语言、Jupyter Notebook工具。
2020年美国新冠肺炎疫情数据分析 厦门大学数据库实验室-林子雨老师
Links
AWS EKS - Create Kubernetes cluster on Amazon EKS | the easy way
Hadoop3.1.3安装教程_单机/伪分布式配置_Hadoop3.1.3/Ubuntu18.04(16.04)
BaoTa / https://www.aapanel.com/index.html
Hadoop:
The Apache™ Hadoop® project develops open-source software for reliable, scalable, distributed computing.
The Apache Hadoop software library is a framework that allows for the distributed processing of large data sets across clusters of computers using simple programming models. It is designed to scale up from single servers to thousands of machines, each offering local computation and storage. Rather than rely on hardware to deliver high-availability, the library itself is designed to detect and handle failures at the application layer, so delivering a highly-available service on top of a cluster of computers, each of which may be prone to failures. URL is https://hadoop.apache.org/
HDFS:
The Hadoop Distributed File System (HDFS) is a distributed file system designed to run on commodity hardware. It has many similarities with existing distributed file systems. However, the differences from other distributed file systems are significant. HDFS is highly fault-tolerant and is designed to be deployed on low-cost hardware. HDFS provides high throughput access to application data and is suitable for applications that have large data sets. HDFS relaxes a few POSIX requirements to enable streaming access to file system data. HDFS was originally built as infrastructure for the Apache Nutch web search engine project. HDFS is now an Apache Hadoop subproject. The project URL is https://hadoop.apache.org/hdfs/.
Spark:
Apache Spark™ is a multi-language engine for executing data engineering, data science, and machine learning on single-node machines or clusters. URL is https://spark.apache.org/
Jupyter Notebook
AWS EKS:
Amazon Elastic Kubernetes Service (Amazon EKS) is a managed container service to run and scale Kubernetes applications in the cloud or on-premises. URL is https://aws.amazon.com/eks/?nc1=h_ls
- Deploy applications with Amazon EKS in the cloud
- Deploy applications with Amazon EKS Anywhere
- Deploy applications with your own tools
PM2:
PM2 is a production process manager for Node.js applications with a built-in load balancer. It allows you to keep applications alive forever, to reload them without downtime and to facilitate common system admin tasks.
BaoTa:
宝塔Linux面板 - 简单好用的服务器运维面板 (要翻墙回去访问,多多少少有毛病我是傻逼,有英文版)宝塔好像是可以搭建docker的
宝塔里面可以安装PM2

-
PySpark is an interface for Apache Spark in Python. It not only allows you to write Spark applications using Python APIs, but also provides the PySpark shell for interactively analyzing your data in a distributed environment. PySpark supports most of Spark’s features such as Spark SQL, DataFrame, Streaming, MLlib (Machine Learning) and Spark Core.
Questions
**怎么才能让aws的虚拟机长时间在后台运行?**那个academy好像过几个小时自动关机
试试看在宝塔里面运行脚本(记不得是重启机器还是重启进程了)
在aws实例里面搞节点kubernetes啥的?
Amazon Elastic Kubernetes Service (EKS) 启动、运行和扩展 Kubernetes 的最可信方式
但好像Hadoop就可以实现了?
实在不行用自己的网站?
下下策矣
PM2和宝塔好像都是用来部署网页的?
管理文件应该也不差
上课讲到pyspark这玩意儿。能否投入使用?
aws咋进入root模式??
Example
本次实验需要对2020年美国新冠肺炎疫情数据作为数据集,以Python为编程语言,使用Spark对数据进行分析,并对分析结果进行可视化。首先需要对数据的采取,在原始数据集.CSV文件组织的,为了方便spark读取生成RDD或者DataFrame,我们需要对us-counties.csv转换为.txt格式文件us-counties.txt,将文件上传至HDFS文件系统中。其次我们需要对采取的数据进行分析,用python完成本实验要统计的8个指标代码在analyst.py文件中,Spark计算结果保存.json文件,方便后续可视化处理。由于使用Python读取HDFS文件系统不太方便,故将HDFS上结果文件转储到本地文件系统中,在可视化中我们需要安装第三方库pyecharts作为可视化工具,具体可视化实现代码在showdata.py文件中展示,编译之后能产生九副可视化图,展示不一样的图形类型对应的意思也不一样。
运行环境:
(1)Linux: Ubuntu 16.04
(2)Hadoop3.1.3 (查看安装教程)
(3)Python: 3.6
(4)Spark: 2.4.0 (查看安装教程)
(5)Jupyter Notebook (查看安装和使用方法教程)
练习
用wsl创建本地的Ubuntu虚拟机系统
VM 或者Virtual Box啥的也可以
在Ubuntu上安装Hadoop
失败操作
*:该版本暂且作废,以参考博客的附录为准
How to Install Hadoop on Ubuntu 18.04 or 20.04
Install OpenJDK on Ubuntu
At the moment, Apache Hadoop 3.x fully supports Java 8. The OpenJDK 8 package in Ubuntu contains both the runtime environment and development kit.
sudo apt install openjdk-8-jdk -y
安装完检查版本
java -version
javac -version

Set Up a Non-Root User for Hadoop Environment
To ensure the smooth functioning of Hadoop services, the user should have the ability to establish a passwordless SSH connection with the localhost.
Install OpenSSH on Ubuntu
sudo apt install openssh-server openssh-client -y

Create Hadoop User
sudo adduser hdoop
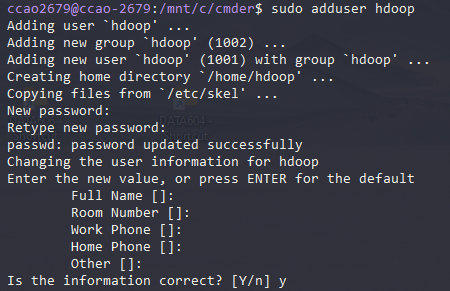
(随便设置密码123456)
su - hdoop切换用户

这条指令注意空格:su - hdoop, 不是su-hdoop
Enable Passwordless SSH for Hadoop User
Generate an SSH key pair and define the location is is to be stored in:
ssh-keygen -t rsa -P '' -f ~/.ssh/id_rsa

Use the cat command to store the public key as authorized_keys in the ssh directory:
cat ~/.ssh/id_rsa.pub >> ~/.ssh/authorized_keys
Set the permissions for your user with the chmod command:
chmod 0600 ~/.ssh/authorized_keys
The new user is now able to SSH without needing to enter a password every time. Verify everything is set up correctly by using the hdoop user to SSH to localhost:
ssh localhost
After an initial prompt, the Hadoop user is now able to establish an SSH connection to the localhost seamlessly

(nmd, 为什么失败了)
connect to host localhost port 22: Connection refused
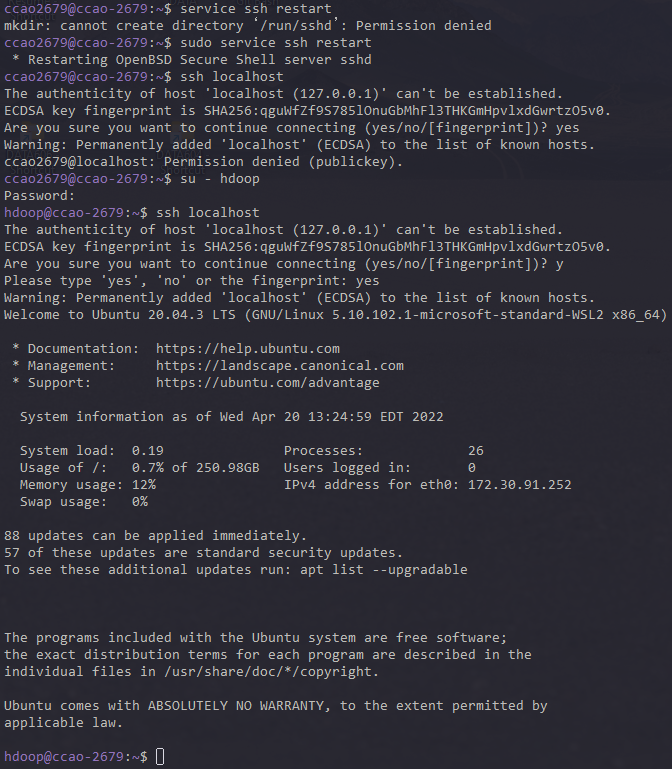
没有管理员权限,来回切换真的很烦
hdoop生成的密钥只能hdoop使用。连接成功
Download and Install Hadoop on Ubuntu
安装文件官网:
https://hadoop.apache.org/releases.html

二进制文件,下载到本地然后编译安装
这边就ubuntu的wget + http下载到本地(先下载再移动进来也可)
wget https://dlcdn.apache.org/hadoop/common/hadoop-3.2.3/hadoop-3.2.3.tar.gz
解压
tar xzf hadoop-3.2.3.tar.gz
然后就可以看到压缩文件和解压后的文件夹

搞个vim后面好编辑
sudo apt-get install vim

Hadoop3.1.3安装教程_单机/伪分布式配置_
Hadoop3.1.3/Ubuntu18.04(16.04)
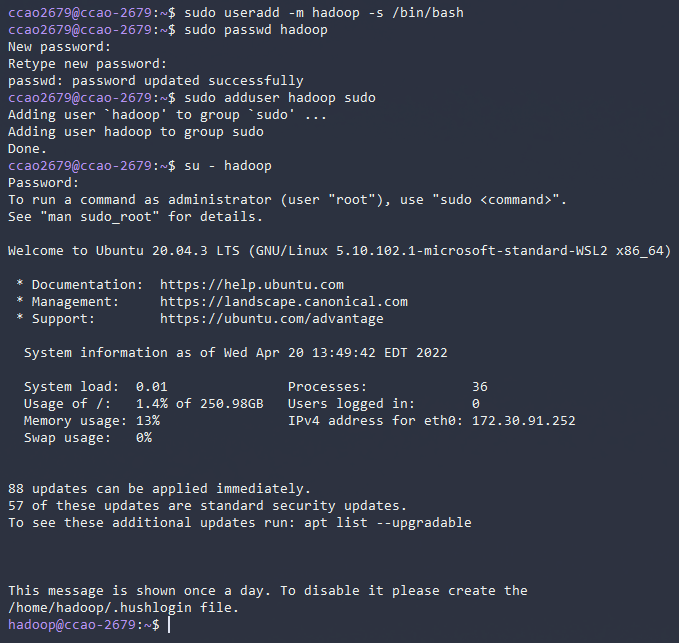
创建新用户
sudo useradd -m hadoop -s /bin/bash
设置或者更新密码
sudo passwd hadoop
添加管理员权限
sudo adduser hadoop sudo
更换用户
su - hadoop
随手更新apt软件列表
sudo apt-get update
装个vim
sudo apt-get install vim
安装SSH、配置SSH无密码登陆
集群、单节点模式都需要用到 SSH 登陆(类似于远程登陆,你可以登录某台 Linux 主机,并且在上面运行命令),Ubuntu 默认已安装了 SSH client,此外还需要安装 SSH server
sudo apt-get install openssh-server
安装后,可以使用如下命令登陆本机:
ssh localhost
(md上面那个影响了publickey,这个要重新开始设置)

创建密钥
新建钥匙
ssh-keygen -t rsa
加入授权
cat ./id_rsa.pub >> ./authorized_keys
删除用户
userdel -r newuser
因为之前用户,所以出现问题干脆删掉所有公钥密钥主机,重新生成就好了

java-1.8.0-openjdk-amd64
修改文件名为hadoop
sudo mv ./hadoop-3.2.3/ ./hadoop
修改文件权限
sudo chown -R hadoop ./hadoop
安装java
(JDK1.8的安装包jdk-8u162-linux-x64.tar.gz放在了百度云盘,可以点击这里到百度云盘下载JDK1.8安装包(提取码:ziyu))
1 | export JAVA_HOME=/usr/lib/jvm/jdk-8u162-linux-x64 |
一直管理员
sudo su

windows 和wsl 传送文件
cp -r C:/Users/15045/Downloads/jdk-8u162-linux-x64.tar.gz /usr/lib/jvm
wsl访问Windows是mnt
/mnt/c/Users/15045/Downloads
sudo cp jdk-8u162-linux-x64.tar.gz /usr/lib/jvm
sudo tar -zxvf jdk-8u162-linux-x64.tar.gz
保存.bashrc文件并退出vim编辑器。然后,继续执行如下命令让.bashrc文件的配置立即生效:
source ~/.bashrc

如果在这一步时提示 Error: JAVA_HOME is not set and could not be found. 的错误,则说明之前设置 JAVA_HOME 环境变量那边就没设置好,请按教程先设置好 JAVA_HOME 变量,否则后面的过程都是进行不下去的。
如果已经按照前面教程在.bashrc文件中设置了JAVA_HOME,还是出现 Error: JAVA_HOME is not set and could not be found. 的错误,那么,请到hadoop的安装目录修改配置文件“/usr/local/hadoop/etc/hadoop/hadoop-env.sh”,在里面找到“export JAVA_HOME=${JAVA_HOME}”这行,然后,把它修改成JAVA安装路径的具体地址,比如,“export JAVA_HOME=/usr/lib/jvm/default-java”,然后,再次启动Hadoop。
Hadoop伪分布式配置
Hadoop 可以在单节点上以伪分布式的方式运行,Hadoop 进程以分离的 Java 进程来运行,节点既作为 NameNode 也作为 DataNode,同时,读取的是 HDFS 中的文件。
Hadoop 的配置文件位于 /usr/local/hadoop/etc/hadoop/ 中,伪分布式需要修改2个配置文件 core-site.xml 和 hdfs-site.xml 。Hadoop的配置文件是 xml 格式,每个配置以声明 property 的 name 和 value 的方式来实现。
etc/hadoop/core-site.xml
1 | <configuration> |
hdfs-site.xml
1 | <configuration> |
Hadoop配置文件说明
Hadoop 的运行方式是由配置文件决定的(运行 Hadoop 时会读取配置文件),因此如果需要从伪分布式模式切换回非分布式模式,需要删除 core-site.xml 中的配置项。
此外,伪分布式虽然只需要配置 fs.defaultFS 和 dfs.replication 就可以运行(官方教程如此),不过若没有配置 hadoop.tmp.dir 参数,则默认使用的临时目录为 /tmp/hadoo-hadoop,而这个目录在重启时有可能被系统清理掉,导致必须重新执行 format 才行。所以我们进行了设置,同时也指定 dfs.namenode.name.dir 和 dfs.datanode.data.dir,否则在接下来的步骤中可能会出错。
执行NameNode的格式化
1 | cd /usr/local/hadoop |

接着开启 NameNode 和 DataNode 守护进程。
1 | cd /usr/local/hadoop |
报错

https://blog.csdn.net/jiecxy/article/details/78003272
https://blog.csdn.net/sonetto/article/details/107640438
不知道为啥要装ssh和openssh-server

成功!
有可能是因为:


jps查看启动的hadoop进程

如果DataNode没有启动,可以尝试如下办法(注意这会删除 HDFS 中原有的所有数据,如果原有的数据很重要请不要这样做):
1 | 针对 DataNode 没法启动的解决方法 |
运行Hadoop伪分布式实例
上面的单机模式,grep 例子读取的是本地数据,伪分布式读取的则是 HDFS 上的数据。要使用 HDFS,首先需要在 HDFS 中创建用户目录:
1 | ./bin/hdfs dfs -mkdir -p /user/hadoop |
教材《大数据技术原理与应用》的命令是以”./bin/hadoop dfs”开头的Shell命令方式,实际上有三种shell命令方式。
\1. hadoop fs
\2. hadoop dfs
\3. hdfs dfshadoop fs适用于任何不同的文件系统,比如本地文件系统和HDFS文件系统
hadoop dfs只能适用于HDFS文件系统
hdfs dfs跟hadoop dfs的命令作用一样,也只能适用于HDFS文件系统
接着将 ./etc/hadoop 中的 xml 文件作为输入文件复制到分布式文件系统中,即将 /usr/local/hadoop/etc/hadoop 复制到分布式文件系统中的 /user/hadoop/input 中。我们使用的是 hadoop 用户,并且已创建相应的用户目录 /user/hadoop ,因此在命令中就可以使用相对路径如 input,其对应的绝对路径就是 /user/hadoop/input:
1 | ./bin/hdfs dfs -mkdir input |
复制完成后,可以通过如下命令查看文件列表:
1 | ./bin/hdfs dfs -ls input |

伪分布式运行 MapReduce 作业的方式跟单机模式相同,区别在于伪分布式读取的是HDFS中的文件(可以将单机步骤中创建的本地 input 文件夹,输出结果 output 文件夹都删掉来验证这一点)。
(这部分是Hadoop单机配置的部分,没管)
Hadoop 默认模式为非分布式模式(本地模式),无需进行其他配置即可运行。非分布式即单 Java 进程,方便进行调试。
Hadoop 运行程序时,输出目录不能存在,否则会提示错误 “org.apache.hadoop.mapred.FileAlreadyExistsException: Output directory hdfs://localhost:9000/user/hadoop/output already exists” ,因此若要再次执行,需要执行如下命令删除 output 文件夹:
1 | ./bin/hdfs dfs -rm -r output # 删除 output 文件夹 |
运行 Hadoop 程序时,为了防止覆盖结果,程序指定的输出目录(如 output)不能存在,否则会提示错误,因此运行前需要先删除输出目录。在实际开发应用程序时,可考虑在程序中加上如下代码,能在每次运行时自动删除输出目录,避免繁琐的命令行操作
2
3
4
5
6
7
8
9
10
11
Job job = new Job(conf);
/\* 删除输出目录 \*/*
Path outputPath = new Path(args[1]);
outputPath.getFileSystem(conf).delete(outputPath, true);
若要关闭 Hadoop,则运行
1 | ./sbin/stop-dfs.sh |
若要关闭 Hadoop,则运行
**下次启动 hadoop 时,无需进行 NameNode 的初始化 **
1 | ./sbin/start-dfs.sh |
数据
原始数据集是以.csv文件组织的,为了方便spark读取生成RDD或者DataFrame,首先将us-counties.csv转换为.txt格式文件us-counties.tx
Kaggle上面应该有足够的数据集 【us-countries.csv】